Securely Deploying a Private EC2 Server with a Bastion Host and Lambda in AWS
Written on February 09, 2025
Views : Loading...
Securely Deploying a Private EC2 Server with a Bastion Host and Lambda: A Step-by-Step Guide
Estimated time to complete: ~1 hour (depending on familiarity with AWS services)
In this tutorial, we’ll walk you through creating a private EC2 server that cannot be accessed directly from the public internet, and then show you how to securely access it through a bastion host (also called a jump box). We’ll also deploy a Lambda function inside the private subnet, so you can see how a serverless function can interact with your private server.
We will cover:
- Setting up a VPC with a public and private subnet.
- Launching a bastion host in the public subnet (to SSH into the private server).
- Launching a production EC2 instance (running a Node.js/Express app) in the private subnet.
- Creating a Lambda function that also runs in the private subnet, communicating privately with the EC2 instance.
- Configuring a NAT Gateway so that your private subnet can reach the internet outbound (for installing packages and updates) without exposing inbound internet traffic.
- Tips for troubleshooting and cleaning up resources after you finish.
By the end of this exercise, you’ll have a “production-like” environment with:
- Bastion host: Public IP, used only for SSH to the private server.
- Production EC2 instance: Private IP only, no direct internet access.
- Lambda function in the same private subnet, able to make HTTP requests to the private server on port 8000.
Table of Contents
- High-Level Architecture
- Create a VPC with Public and Private Subnets
- Launch a Bastion Host in the Public Subnet
- (Optional) Setting Up a NAT Gateway
- Why NAT is Needed
- Steps to Create a NAT Gateway
- Create the Production EC2 Instance in the Private Subnet
- SSH into Your Private EC2 via Bastion
- Create & Configure a Lambda Function in the Private Subnet
- Test, Debug, and View Logs
- Clean Up
- Final Thoughts
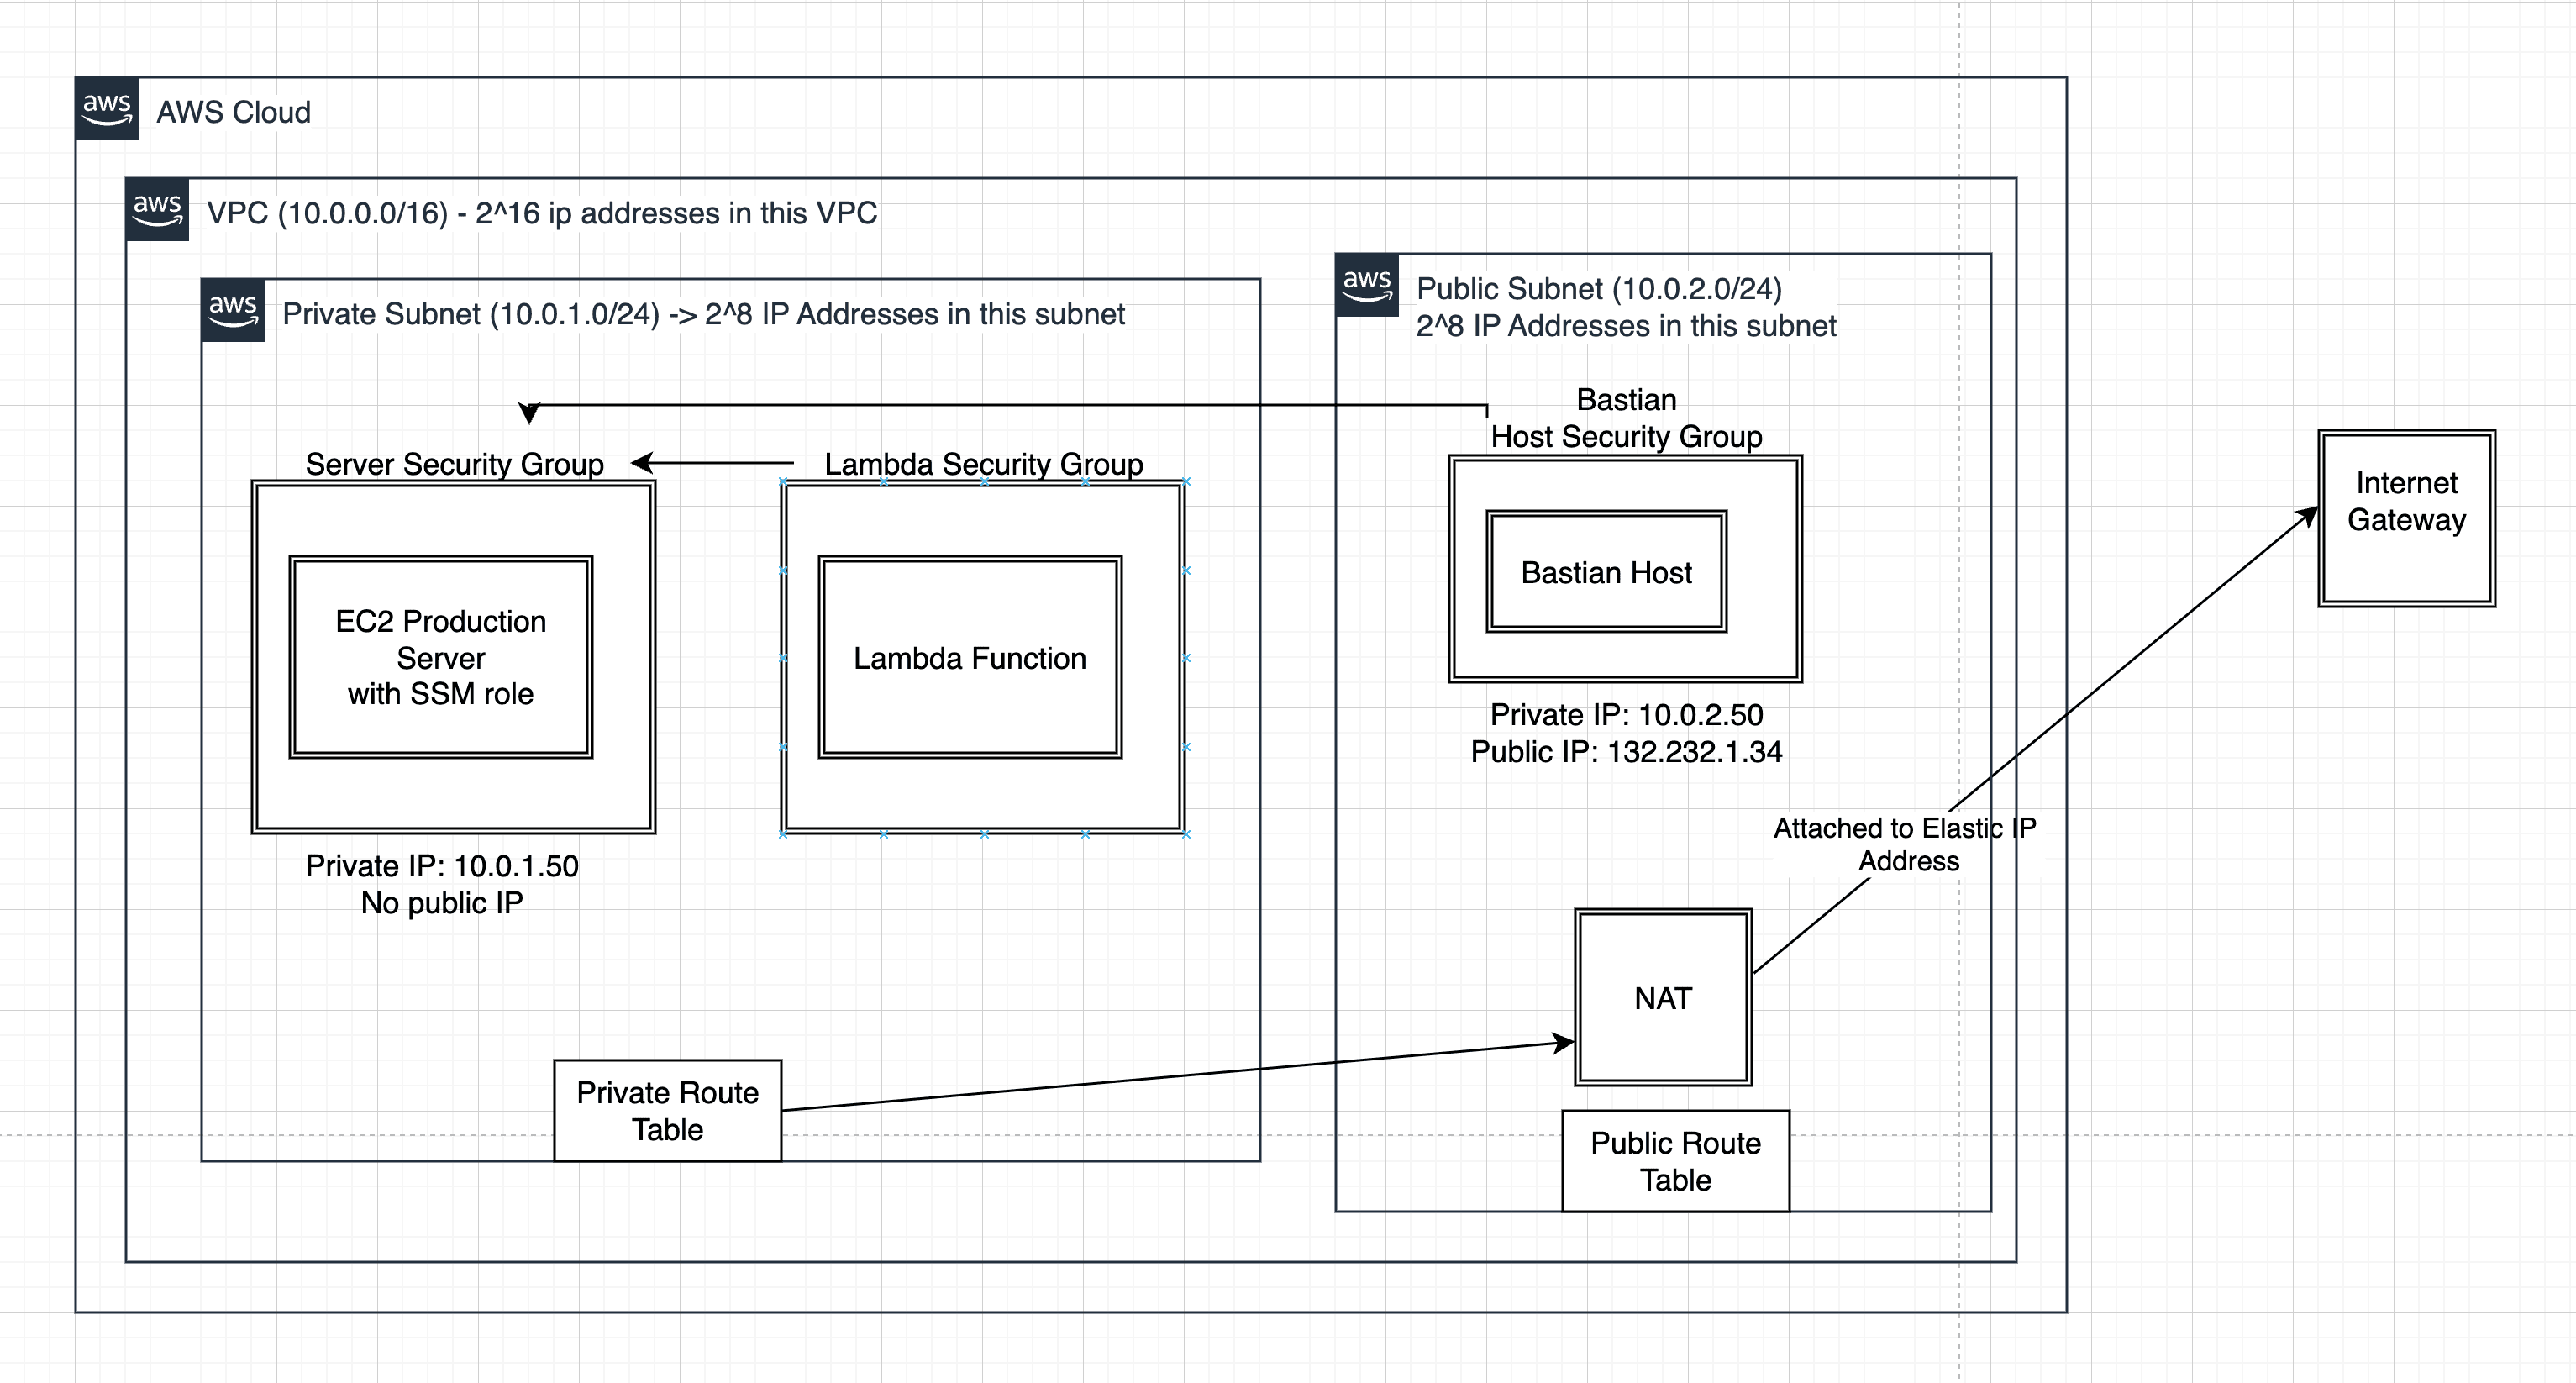
1. High-Level Architecture
Below is the conceptual layout we’re aiming for:
                       +--------------------+
    Internet  <------> |   Internet Gateway |
                       +--------------------+
                               |
                         (Public Route)
                               |
                     Public Subnet (Bastion)
                       +------------------+
                       |   Bastion Host   |
                       |    (SSH Access)  |
                       +------------------+
                               |
                       (No direct route)
                               |
                     Private Subnet (Prod)
                       +------------------+
                       |  Production EC2  |
                       |   (Express App)  |
                       +------------------+
                               ^
                               |
                      Lambda in the same
                       private subnet
- Public Subnet: Routes to the Internet Gateway, letting the Bastion host have a public IP.
- Private Subnet: No internet route, so the Production EC2 is hidden from external access.
- Bastion Host: You SSH here first, then “jump” to the private EC2.
- Lambda: Runs inside the same private subnet, reaching the private EC2 on port 8000.
2. Create a VPC with Public and Private Subnets
Why Are We Doing This?
A VPC (Virtual Private Cloud) is your isolated network environment in AWS. By creating both a public and a private subnet, we can control which resources are exposed to the internet and which are hidden.
2.1 Create a New VPC
- Go to AWS Management Console → VPC → Your VPCs → Create VPC.
- Select VPC Only (manual) or the advanced option if available.
- Provide:
- Name tag:
MyProductionVPC - IPv4 CIDR block:
10.0.0.0/16 - (Optional) IPv6 set to “No IPv6 CIDR Block” for simplicity.
- Name tag:
- Click Create VPC.
2.2 Create a Public Subnet
- In VPC, select Subnets → Create subnet.
- VPC:
MyProductionVPC. - Subnet name:
MyPublicSubnet. - Availability Zone: pick one (e.g.
us-east-1a). - IPv4 CIDR block:
10.0.1.0/24. - Click Create subnet.
2.3 Create a Private Subnet
- Again, click Create subnet.
- VPC:
MyProductionVPC. - Subnet name:
MyPrivateSubnet. - Availability Zone: the same or different from public (e.g.
us-east-1a). - IPv4 CIDR block:
10.0.2.0/24. - Click Create subnet.
2.4 Create and Attach an Internet Gateway
- In VPC → Internet Gateways → Create internet gateway.
- Name tag:
MyInternetGW. - Click Create internet gateway, then Attach to VPC and select
MyProductionVPC.
2.5 Create a Route Table for the Public Subnet
- VPC → Route Tables → Create route table.
- Name:
MyPublicRouteTable - VPC:
MyProductionVPC - Click Create.
- Name:
- Select
MyPublicRouteTable→ Routes tab → Edit routes:- Add route
0.0.0.0/0→ Target:MyInternetGW. - Save.
- Add route
- Subnet associations → Edit subnet associations → select
MyPublicSubnet→ Save.
Now the MyPublicSubnet can access the internet through the Internet Gateway.
2.6 Confirm the Private Subnet is Private
- By default, the MyPrivateSubnet uses the main route table with no route to the internet. That makes it a true private subnet.
At this point:
- Public subnet (10.0.1.0/24) → has internet route.
- Private subnet (10.0.2.0/24) → no internet route.
3. Launch a Bastion Host in the Public Subnet
Why Are We Doing This?
A bastion host (jump box) provides a secure entry point into your private subnet. Instead of giving your private server a public IP, you place a small EC2 instance in the public subnet, lock it down to your IP address, and SSH into it. Then from the bastion, you connect to the private server.
3.1 Launch an EC2 for the Bastion
- EC2 → Instances → Launch instances.
- Name:
MyBastionHost. - AMI: Amazon Linux 2 (or any Linux distro).
- Instance type:
t2.micro(free tier-eligible). - Key pair: Choose or create a key pair for SSH.
- Network settings:
- VPC:
MyProductionVPC. - Subnet:
MyPublicSubnet. - Auto-assign Public IP: Enable.
- Security group: Create a new one called
BastionSG.- Inbound rule: SSH from My IP only.
- Outbound rule: default allow all is fine.
- VPC:
- Click Launch instance.
Once running, it will have a public IPv4 address. You can SSH to it from your local machine using:
ssh -i /path/to/key.pem ec2-user@<bastion_public_ip>
4. (Optional but Recommended) Setting Up a NAT Gateway
If you want your private EC2 server to download packages (e.g., via
yum updateor to install Node.js), you need outbound internet. Since the private subnet has no direct internet route, you must use a NAT Gateway in the public subnet.
4.1 Why NAT is Needed
- NAT Gateway allows outbound traffic from the private subnet to the internet but blocks any inbound traffic that’s unsolicited. This ensures your private server remains invisible to the public while still being able to fetch updates or install software.
4.2 Allocate an Elastic IP
- Go to EC2 → Elastic IPs.
- Click Allocate Elastic IP address → Allocate.
- Note the new Elastic IP.
4.3 Create a NAT Gateway in the Public Subnet
- Go to VPC → NAT Gateways → Create NAT Gateway.
- Name:
MyNATGateway. - Subnet:
MyPublicSubnet. - Elastic IP: Select the one you just allocated.
- Click Create NAT Gateway. Wait for status “available.”
4.4 Update the Private Subnet’s Route Table
- VPC → Route Tables → find the route table for the private subnet (often the “Main” one, if you haven’t created a separate one).
- Routes → Edit routes:
- Add
0.0.0.0/0→ Target:nat-xxxxxxxx. - Save.
- Add
Now your private EC2 can reach the internet (outbound).
# On your private EC2:
ping google.com
# or
sudo yum update -y
It should work without timing out.
5. Create the Production EC2 Instance in the Private Subnet
Why Are We Doing This?
We want our “production” app to remain inaccessible from the public internet. That’s why it goes into the private subnet. We’ll install a Node.js/Express app listening on port 8000.
5.1 Create a Security Group for Production (ProductionEC2SG)
- EC2 → Security Groups → Create security group.
- Name:
ProductionEC2SG. - VPC:
MyProductionVPC. - Inbound rules:
- SSH (22) → Source:
BastionSG(meaning only the bastion host can SSH). - Custom TCP (port 8000) → For now, set the source to
0.0.0.0/0or leave it blank. We’ll refine it later for our Lambda.
- SSH (22) → Source:
- Click Create security group.
5.2 Launch the Private EC2
- EC2 → Instances → Launch instances.
- Name:
MyProductionEC2. - AMI: Amazon Linux 2.
- Instance type:
t2.micro. - Key pair: Optional (but if you want to be able to SSH directly from bastion, pick one).
- Network settings:
- VPC:
MyProductionVPC. - Subnet:
MyPrivateSubnet. - Auto-assign Public IP: Disable.
- Security group:
ProductionEC2SG.
- VPC:
- Advanced details → User data: (Installs Node.js, Express, and sets up a simple GET/POST server.)
#!/bin/bash
yum update -y

yum install -y amazon-linux-extras
amazon-linux-extras enable nodejs16
yum install -y nodejs git

mkdir /home/ec2-user/simple-app
cd /home/ec2-user/simple-app
npm init -y
npm install express body-parser

cat << 'EOF' > index.js
const express = require('express');
const bodyParser = require('body-parser');
const app = express();
const port = 8000;

app.use(bodyParser.json());

// GET endpoint
app.get('/', (req, res) => {
  console.log('Received GET request');
  res.send('Hello from my private EC2 instance!');
});

// POST endpoint
app.post('/data', (req, res) => {
  console.log('Received POST data:', req.body);
  res.json({ message: 'Data received', data: req.body });
});

app.listen(port, () => {
  console.log(`Server running on port ${port}`);
});
EOF

node index.js > /home/ec2-user/app.log 2>&1 &
if you want to use SSM, attach an SSM role to this ec2, and you can use this user data for ubuntu here:
#!/bin/bash
# Update the package list
sudo apt update -y

# Download the Session Manager plugin deb package
curl "https://s3.amazonaws.com/session-manager-downloads/plugin/latest/ubuntu_64bit/session-manager-plugin.deb" -o "session-manager-plugin.deb"

# Install the package
sudo dpkg -i session-manager-plugin.deb

# Clean up the installer file
rm -f session-manager-plugin.deb

# Verify installation
session-manager-plugin --version
- Launch the instance. It will start in the private subnet with no public IP.
6. SSH into Your Private EC2 via Bastion
Why Are We Doing This?
When your private EC2 has no public IP, you need a secure path for administrative tasks. The bastion host is that pathway.
6.1 SSH from Your Local Machine → Bastion
ssh -i /path/to/your-bastion-key.pem ec2-user@<bastion_public_ip>
(Ensure you used the correct key pair and the SG allows SSH from your IP.)
6.2 From Bastion → Private EC2
While on the bastion:
- Note the private IP of
MyProductionEC2(e.g., 10.0.2.50). - SSH in:
Sincessh ec2-user@10.0.2.50ProductionEC2SGallows inbound SSH fromBastionSG, you’ll get in.
6.3 Confirm the Node App is Running
curl localhost:8000
You should see your “Hello from my private EC2 instance!” message.
7. Create & Configure a Lambda Function in the Private Subnet
Why Are We Doing This?
We want to demonstrate how a serverless function can interact with our private server. The Lambda will live in the private subnet (or subnets) so it can call the private server’s IP without using the internet.
7.1 Create the Lambda Function
- Lambda → Create function.
- Name:
MyPrivateLambda. - Runtime: Node.js (e.g., 16.x).
- Execution role: “Basic Lambda execution role” or create a new one if needed.
- Click Create function.
7.2 Configure VPC Settings for Lambda
- Go to Configuration → VPC → Edit.
- VPC:
MyProductionVPC. - Subnets:
MyPrivateSubnet. - Security group: Create or choose a new one, e.g.,
LambdaSG. - Save.
7.3 Update Security Groups
- ProductionEC2SG must allow inbound on port 8000 from
LambdaSG.- Go to EC2 → Security Groups → select
ProductionEC2SG→ Inbound rules → add or edit the rule for port 8000 to Source:LambdaSG.
- Go to EC2 → Security Groups → select
7.4 Write the Lambda Code
Replace <your_private_ec2_ip> with the private IP of your MyProductionEC2 instance.
const http = require('http');

exports.handler = async (event) => {
    // Example private IP of the Production EC2:
    const ec2PrivateIp = '10.0.2.50';

    // 1) Perform a GET request
    const getResponse = await new Promise((resolve, reject) => {
        const options = { hostname: ec2PrivateIp, port: 8000, path: '/', method: 'GET' };
        const req = http.request(options, (res) => {
            let data = '';
            res.on('data', (chunk) => data += chunk);
            res.on('end', () => resolve(data));
        });
        req.on('error', (e) => reject(e));
        req.end();
    });

    console.log('GET response:', getResponse);

    // 2) Perform a POST request
    const postData = JSON.stringify({ foo: 'bar', hello: 'world' });
    const postResponse = await new Promise((resolve, reject) => {
        const options = {
            hostname: ec2PrivateIp,
            port: 8000,
            path: '/data',
            method: 'POST',
            headers: {
                'Content-Type': 'application/json',
                'Content-Length': Buffer.byteLength(postData)
            }
        };
        const req = http.request(options, (res) => {
            let data = '';
            res.on('data', (chunk) => data += chunk);
            res.on('end', () => resolve(data));
        });
        req.on('error', (e) => reject(e));
        req.write(postData);
        req.end();
    });

    console.log('POST response:', postResponse);

    return {
        statusCode: 200,
        body: JSON.stringify({
            getResult: getResponse,
            postResult: postResponse
        }),
    };
};
Click Deploy to save your changes.
8. Test, Debug, and View Logs
8.1 Test the Lambda
- In the Lambda console, click Test at the top.
- Use a simple JSON test event like
{}. - Click Test again.
Check the Execution result pane:
- If successful, you’ll see a 200 response with the GET/POST data from the private server.
- If you see an error like “Connection timed out,” recheck:
- The private IP address in the code.
- Security group rules (port 8000 inbound from
LambdaSG). - Lambda’s VPC/subnet configuration.
8.2 Check Lambda Logs
- Go to CloudWatch → Logs → Log groups → find your Lambda log group (usually
/aws/lambda/MyPrivateLambda). - Inside, you’ll see logs from each invocation, including the
console.logstatements for GET/POST responses.
8.3 Real-Time Debug on Private EC2
- SSH into
MyProductionEC2(via the bastion). - Run:
You’ll see each request hitting your Express server.tail -f /home/ec2-user/app.log
9. Clean Up
Important: When you’re done, clean up to avoid unwanted charges!
- Terminate the EC2 Instances (Bastion and Production).
- EC2 → Instances → select each → Instance state → Terminate.
- Delete the Lambda Function.
- Lambda → select
MyPrivateLambda→ Actions → Delete function.
- Lambda → select
- Delete Security Groups (
BastionSG,ProductionEC2SG,LambdaSG).- EC2 → Security Groups → select → Delete.
- Delete NAT Gateway (if created).
- VPC → NAT Gateways → select → Delete.
- Also release the Elastic IP in EC2 → Elastic IPs.
- Detach & Delete Internet Gateway.
- VPC → Internet Gateways → detach from VPC → delete.
- Delete the Subnets (
MyPublicSubnet,MyPrivateSubnet). - Delete the VPC (
MyProductionVPC).
Double-check you have no leftover EBS volumes in EC2 → Volumes.
10. Final Thoughts
Congratulations! You’ve built a more “production-like” AWS environment:
- A private EC2 server that’s hidden from direct internet access.
- A bastion host in a public subnet for secure SSH access.
- A Lambda function that can communicate internally to your private server.
- (Optionally) a NAT Gateway that provides outbound internet access.
Key Takeaway:
Private subnets enhance security by preventing inbound traffic from the public internet. When you do need to download updates/packages on a private EC2, you typically add a NAT Gateway in the public subnet.
Feel free to extend this setup with:
- An Application Load Balancer in the public subnet, routing to the private subnet.
- AWS Systems Manager Session Manager, to skip bastion hosts altogether.
- Terraform or AWS CloudFormation, to automate deployments.
We hope this guide helps you understand how to create a secure environment on AWS. Happy building!
Appendix: Quick Reference
Short Answer (Why NAT is Needed)
If your private EC2 times out installing packages, it has no internet route. A NAT Gateway in the public subnet solves this, allowing outbound-only traffic.
Troubleshooting
- “Connection refused” from Lambda → Check security group rules, private IP in code, and that Express is running on port 8000.
- “Can’t SSH from Bastion” → Confirm inbound SSH on
BastionSGfrom your IP, and thatProductionEC2SGallows SSH fromBastionSG. - “User Data not working” → Ensure NAT Gateway is set up before instance boots (otherwise the instance can’t download packages on first boot).
Thank you for following this tutorial!
Share this blog
Related Posts
18-05-2025
Learn how to build a robust, serverless application on AWS to perform calculations like $f(x) = x^2 ...
09-12-2024
This blog is dedicated to simplifying complex mathematical and computational concepts into understan...
01-12-2024
Static Range Sum queries using various Algorithms
30-11-2024
An in-depth exploration of JavaScript iteration methods and best practices in asynchronous programmi...
26-11-2024
An in-depth exploration of an efficient algorithm to compute the sum of Euler's Totient Function up ...
25-11-2024
In the realm of graph theory, understanding the connectivity of a network is crucial for numerous ap...
24-11-2024
Dive deep into the Z Algorithm, a fundamental technique in string processing. This blog elucidates t...

21-11-2024
A comprehensive guide to understanding derangements using the inclusion and exclusion principle.

20-11-2024
Dive into the fascinating world of combinatorics as we explore the number of ways to tile a $3 \time...